Step-by-Step Reference (20)
Every captured screen in setup order. Click any image to open the full-size version in a new tab.
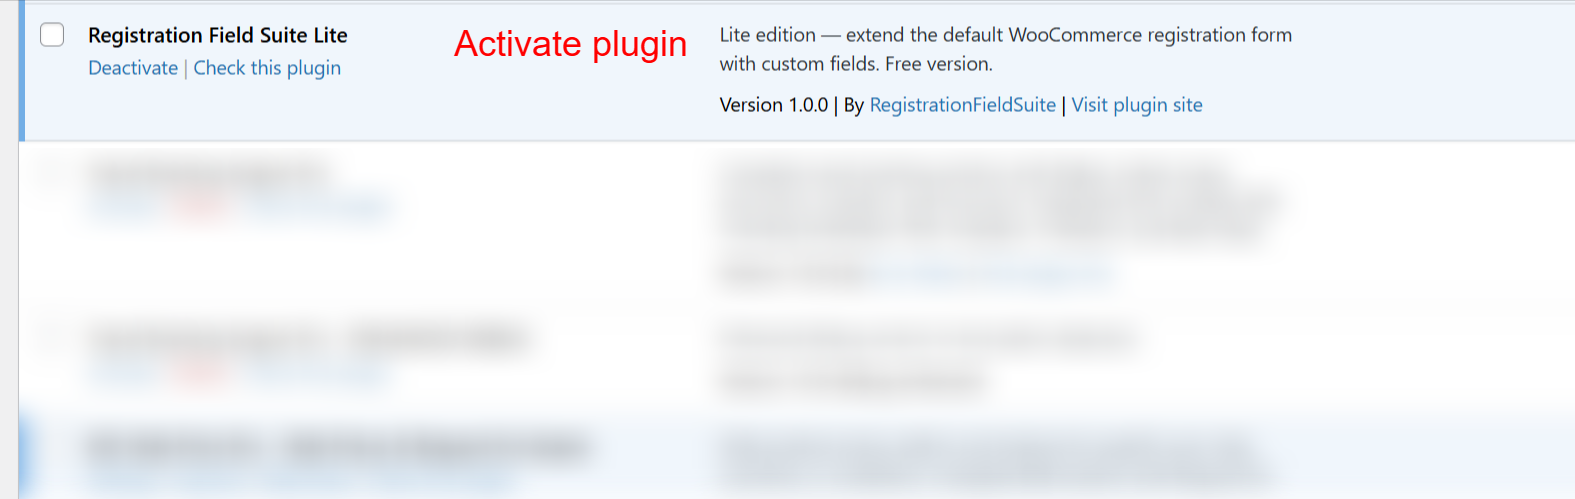
wp-admin: Plugin Activation List
What this shows: This interface shows the installed plugins list in the WordPress admin panel. It displays the Registration Field Suite Lite plugin with options to ‘Deactivate’ or ‘Check this plugin’. The plugin’s description is also visible.
On this screen, you can activate the Registration Field Suite Lite plugin, which is essential for extending the functionality of WooCommerce registration forms. Activating the plugin enables you to add custom fields to the default WooCommerce registration form without needing additional customization.
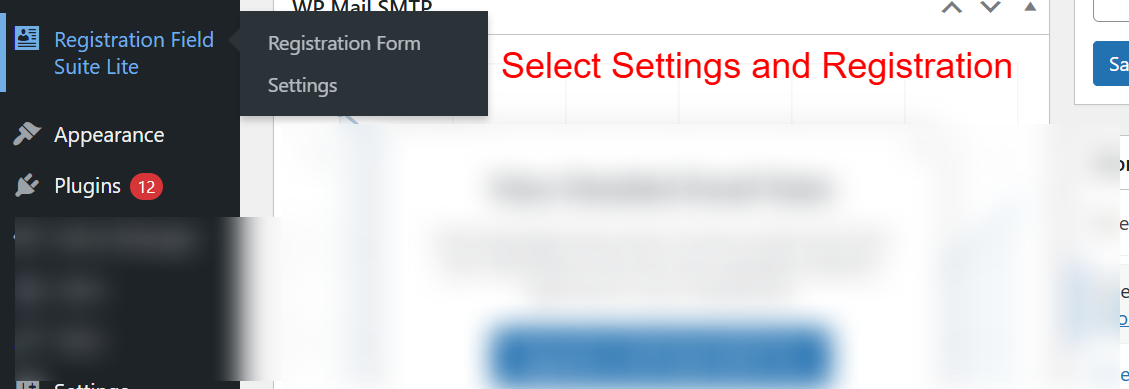
wp-admin: Select Settings and Registration
What this shows: The screenshot shows a dropdown menu under ‘Registration Field Suite Lite’ in the WordPress admin sidebar, with options for ‘Registration Form’ and ‘Settings’.
In this area of the WordPress admin dashboard, you can access the key features of the Registration Field Suite Lite plugin. You can navigate to ‘Registration Form’ to manage custom fields or to ‘Settings’ for configuring the plugin’s operational parameters.
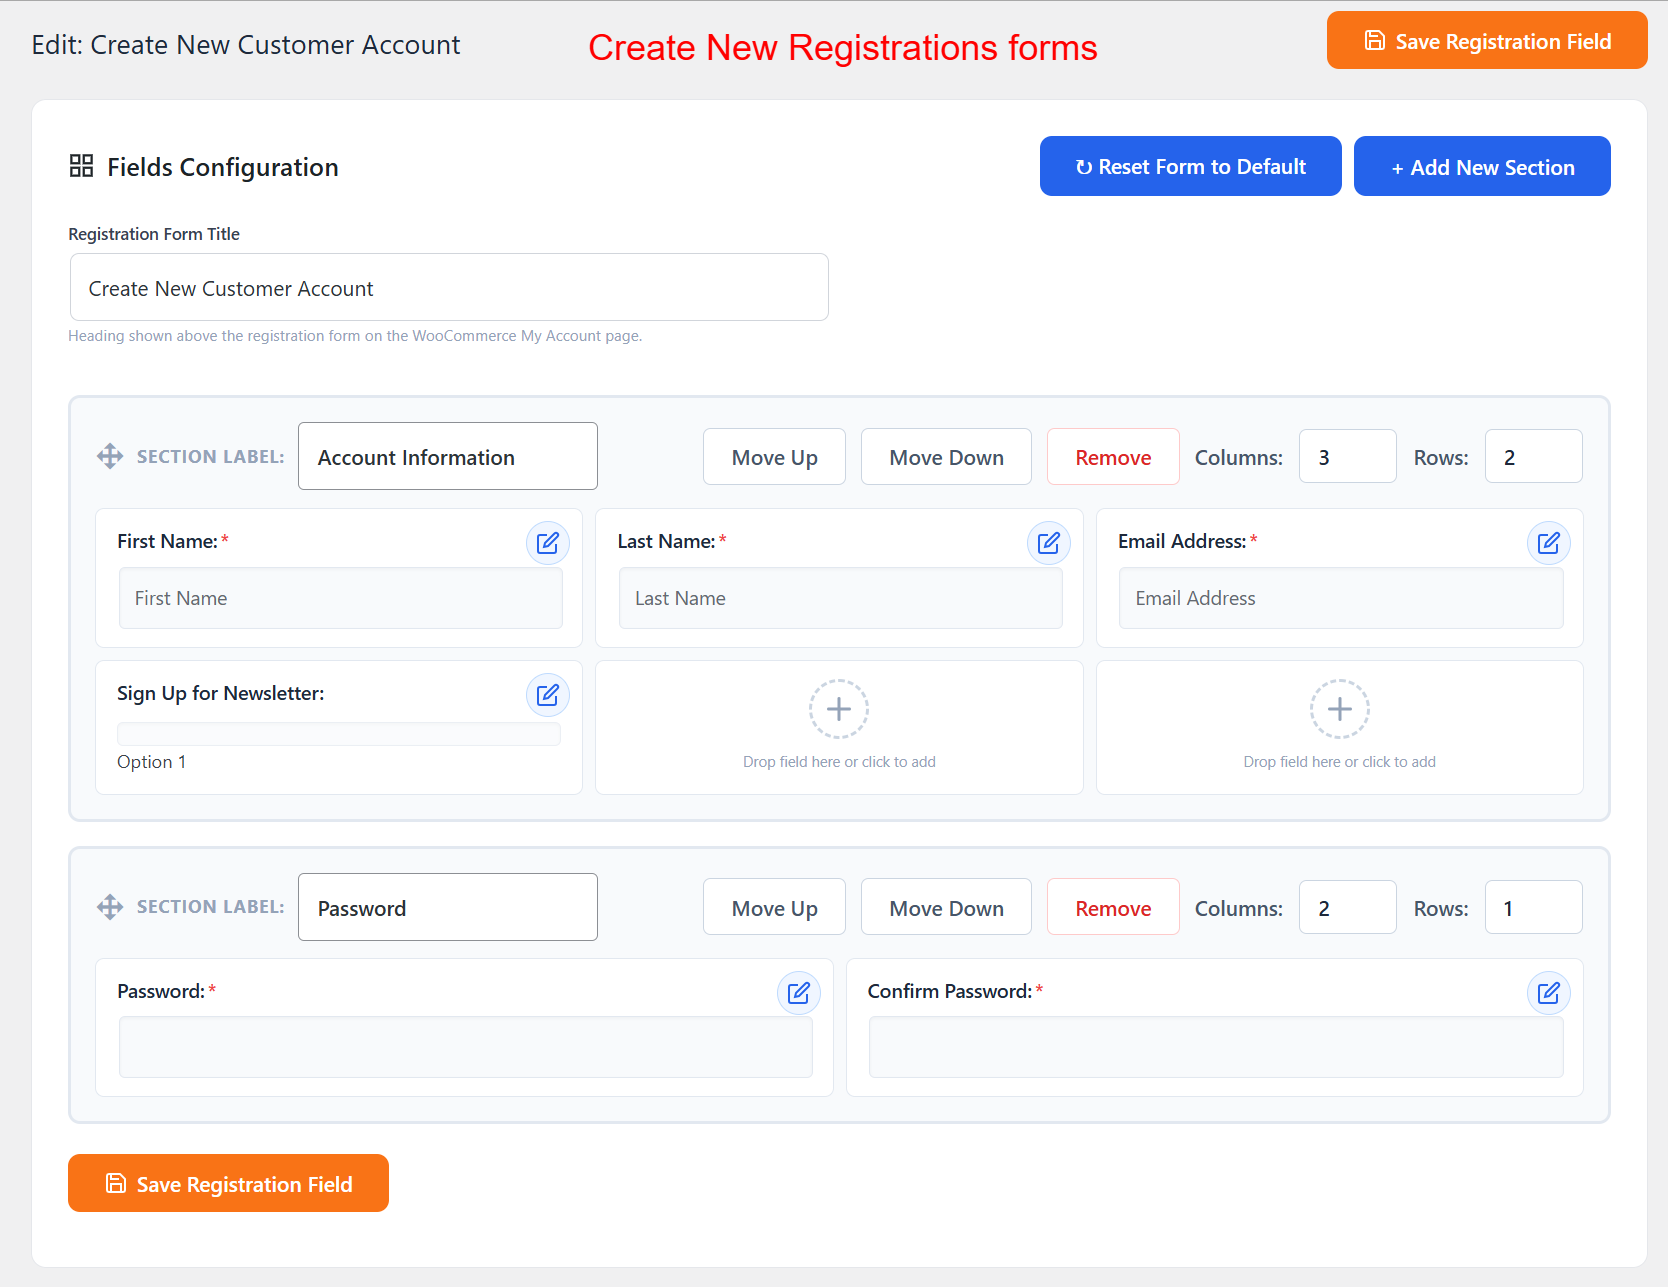
Create New Registrations Form Interface
What this shows: This interface allows you to create or edit a WooCommerce registration form, displaying field configurations, section labels, and options to add or remove fields.
This screen is where you can design and customize the registration forms for your WooCommerce store. You can add new fields, arrange them in sections, and define how they display to users on the registration page, making it easier to collect necessary customer information.
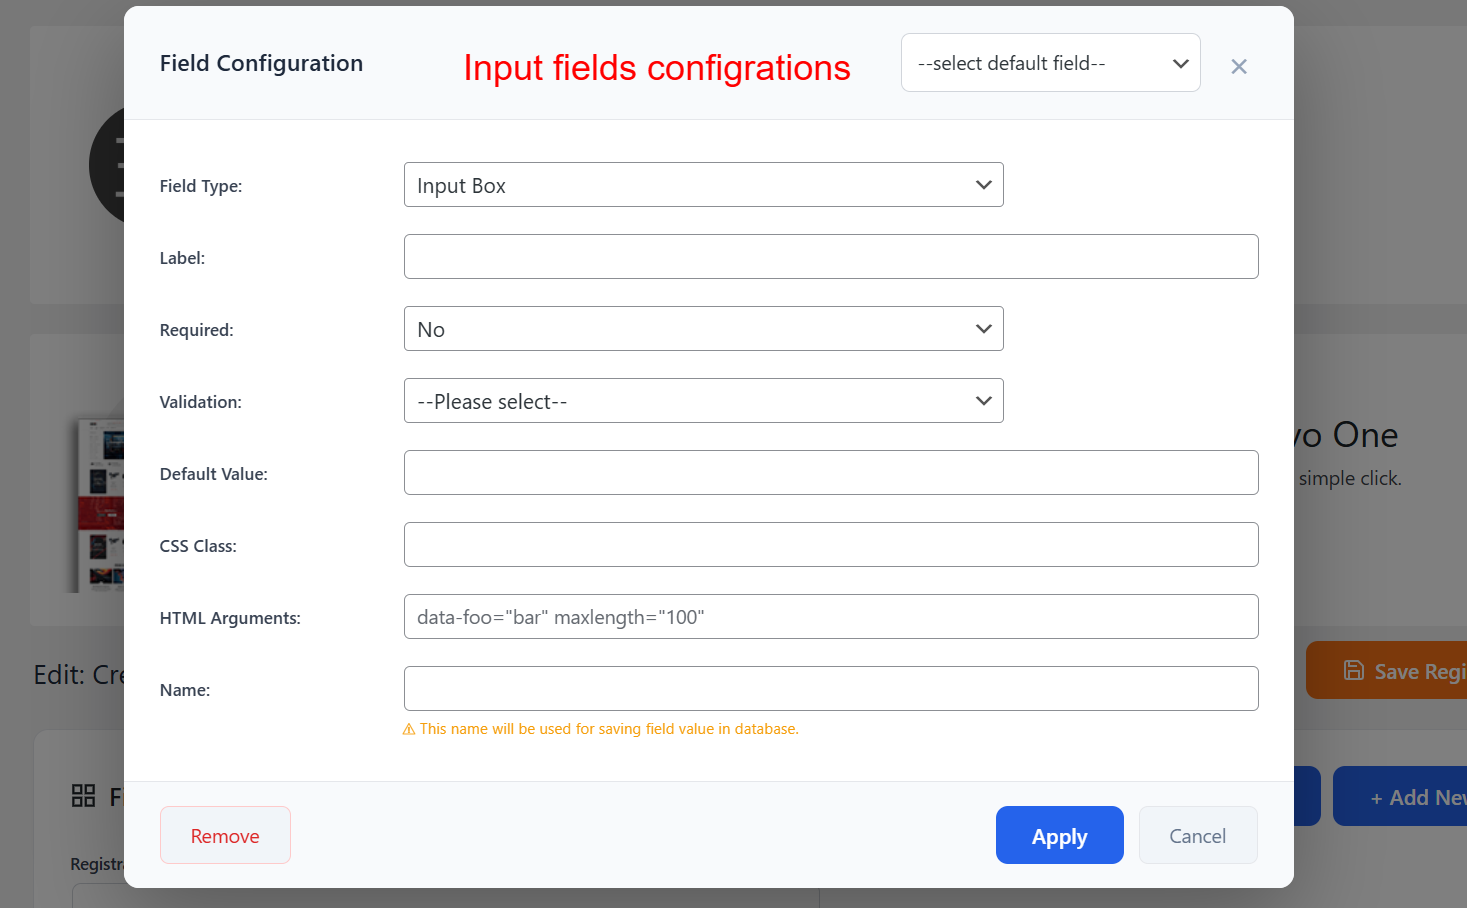
Field Configurations Modal
What this shows: A modal for configuring each form field, showing options like Field Type, Label, Required, Validation, Default Value, CSS Class, and HTML Arguments.
Within the field configuration modal, you can fine-tune the details of each custom field you add to your registration form. Define whether a field is mandatory, its input type, validation rules, and additional HTML for enhanced design and functionality.
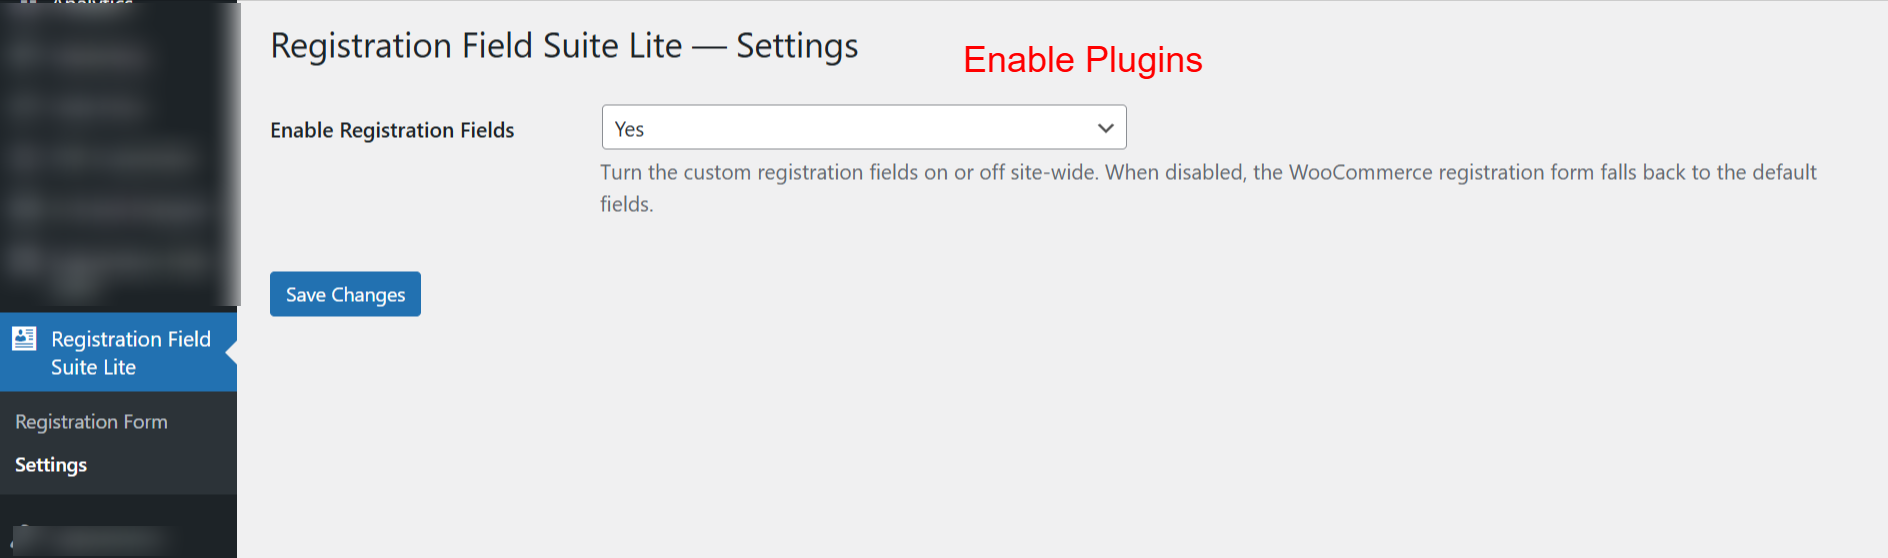
General Settings: Enable Plugin Features
What this shows: Settings page of the plugin displaying a dropdown to enable or disable registration fields with a ‘Save Changes’ button.
This settings page allows you to enable or disable the Registration Field Suite Lite plugin’s custom fields across your site. Choosing ‘Yes’ ensures that the custom fields are visible and functional on your WooCommerce registration forms.
Set Default Field Type
What this shows: Field configuration screen showing a dropdown menu with various field types like Input Box, Password, Checkbox(es), and others.
On this screen, select the type of input field you want to add to your registration form. Options include input boxes, checkboxes, radio buttons, and more, allowing you to gather specific data types from registrants.

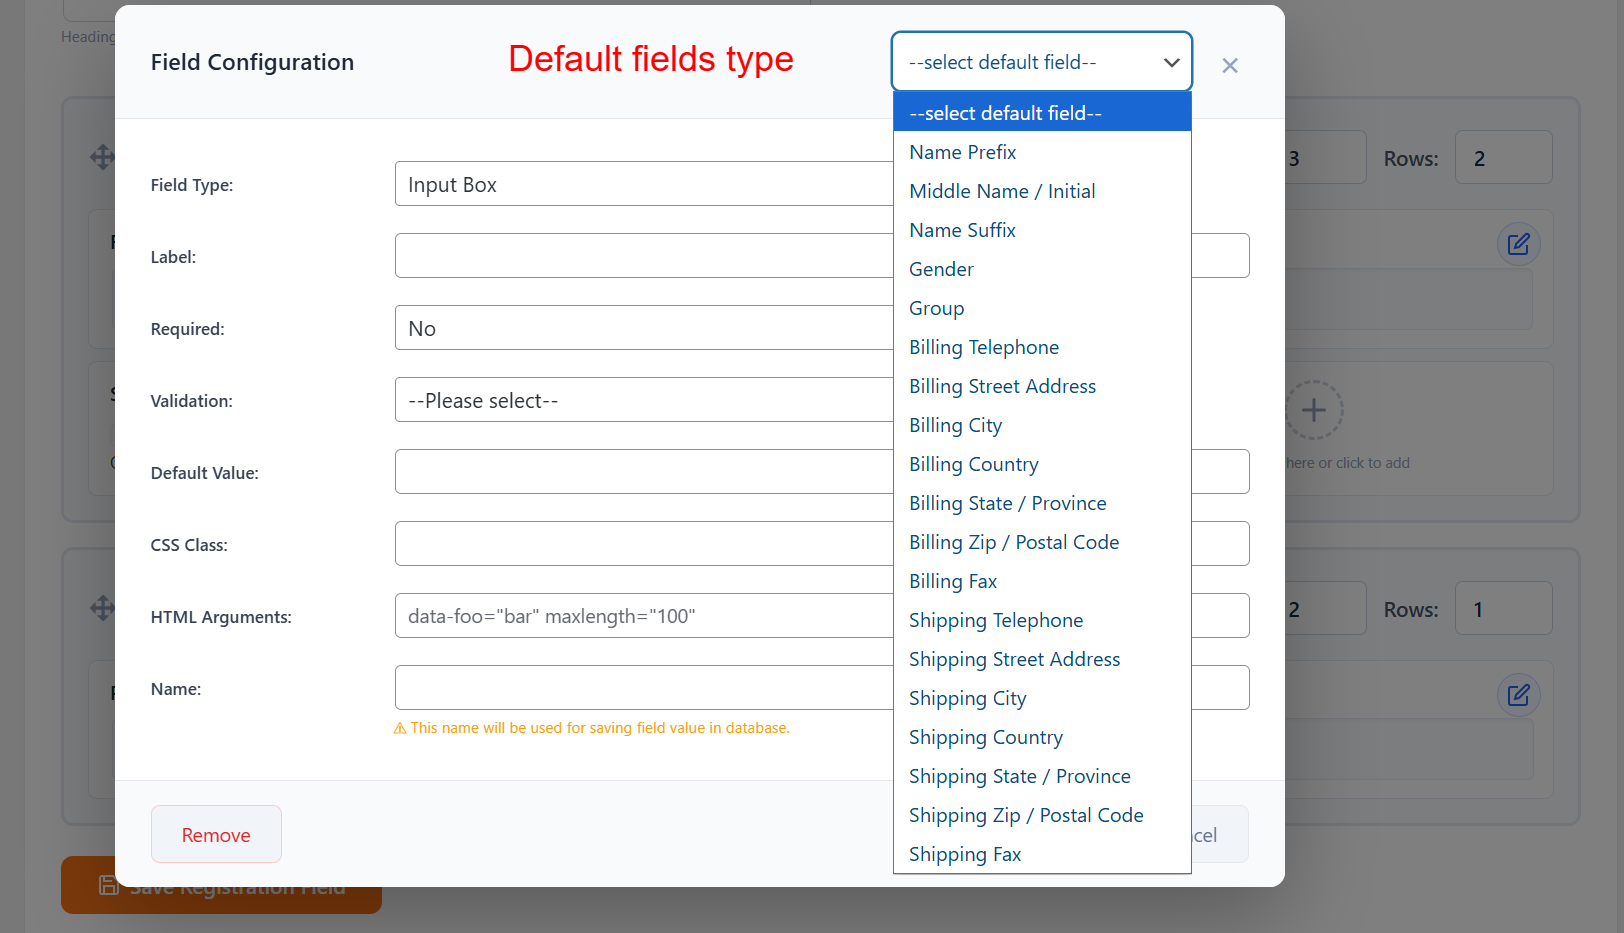
Choose Default Fields
What this shows: Field configuration interface with a dropdown to select default fields like Name Prefix, Gender, Billing Address, etc.
Here, choose from a list of default fields related to customer details, such as Name Prefix or Billing Information. This makes setting up comprehensive registration forms quick and straightforward.
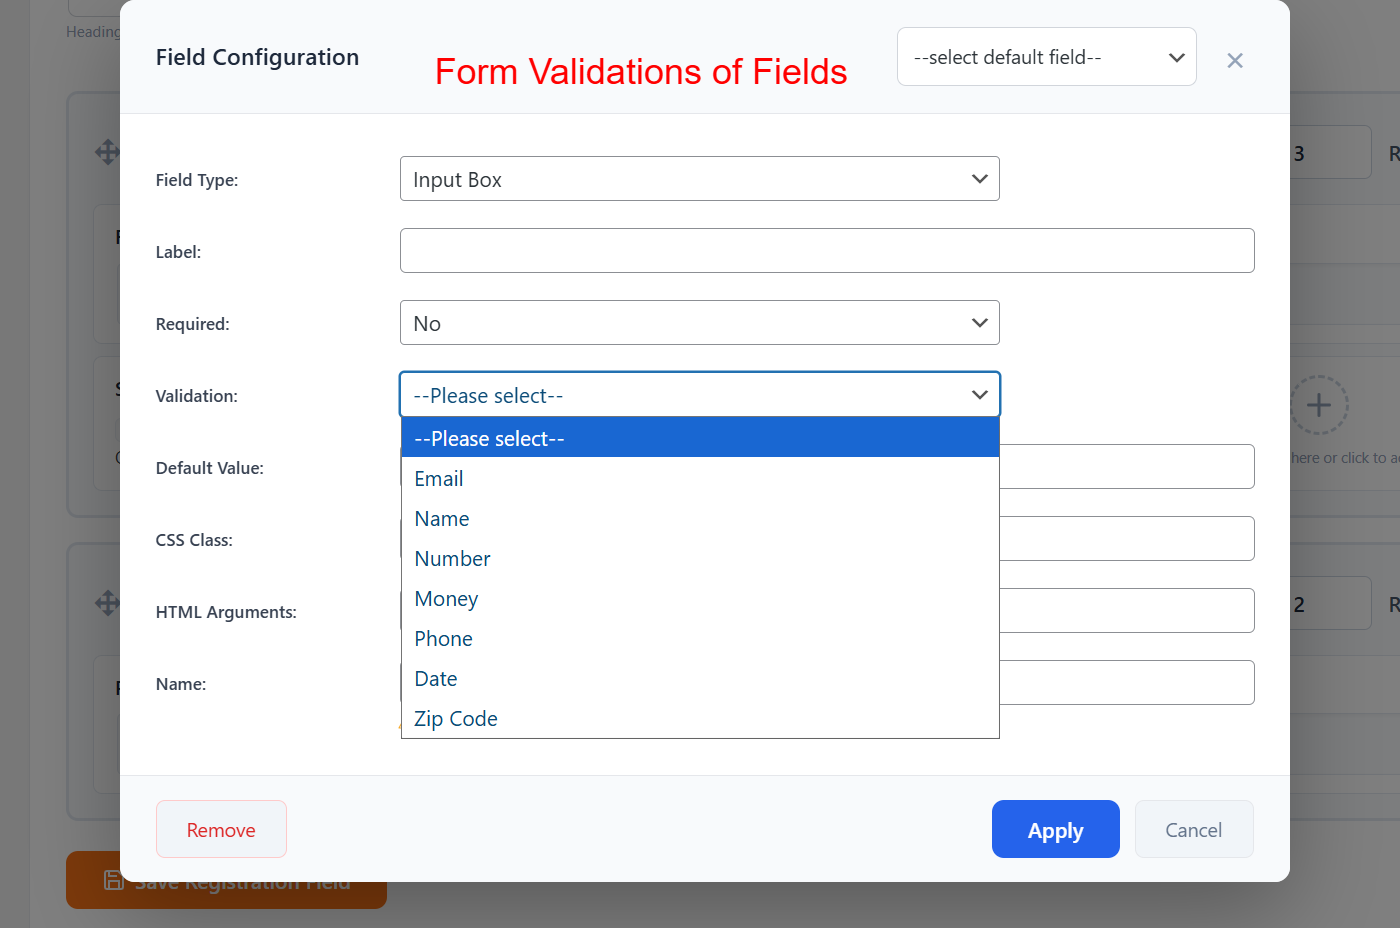
Form Field Validations Selection
What this shows: Field configuration panel displaying a dropdown for choosing validation types like Email, Name, Number, Phone, etc.
This part of the configuration allows you to apply validation rules to your form fields, ensuring that the data entered by users complies with specific criteria, such as format or type, enhancing form reliability and data accuracy.
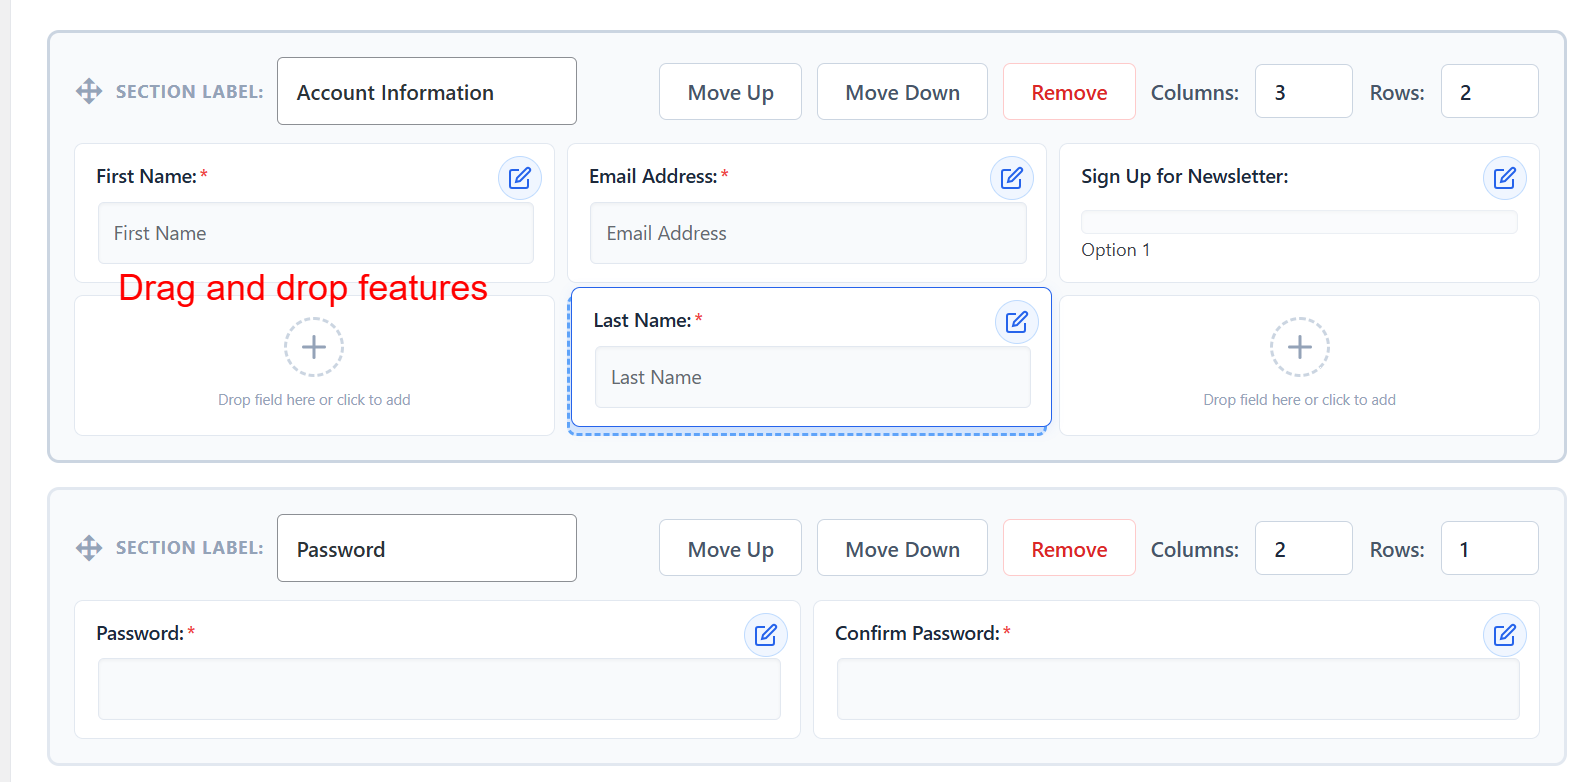
wp-admin: Form Configuration > Drag and Drop
What this shows: This screen lets you arrange ‘Account Information’ and ‘Password’ fields using drag-and-drop. It has options to move sections up/down or remove them.
In this configuration screen, you can customize the WooCommerce registration form by dragging and dropping fields within sections. Each section features controls to move or delete fields, making it easy to tailor the form to your specific needs.
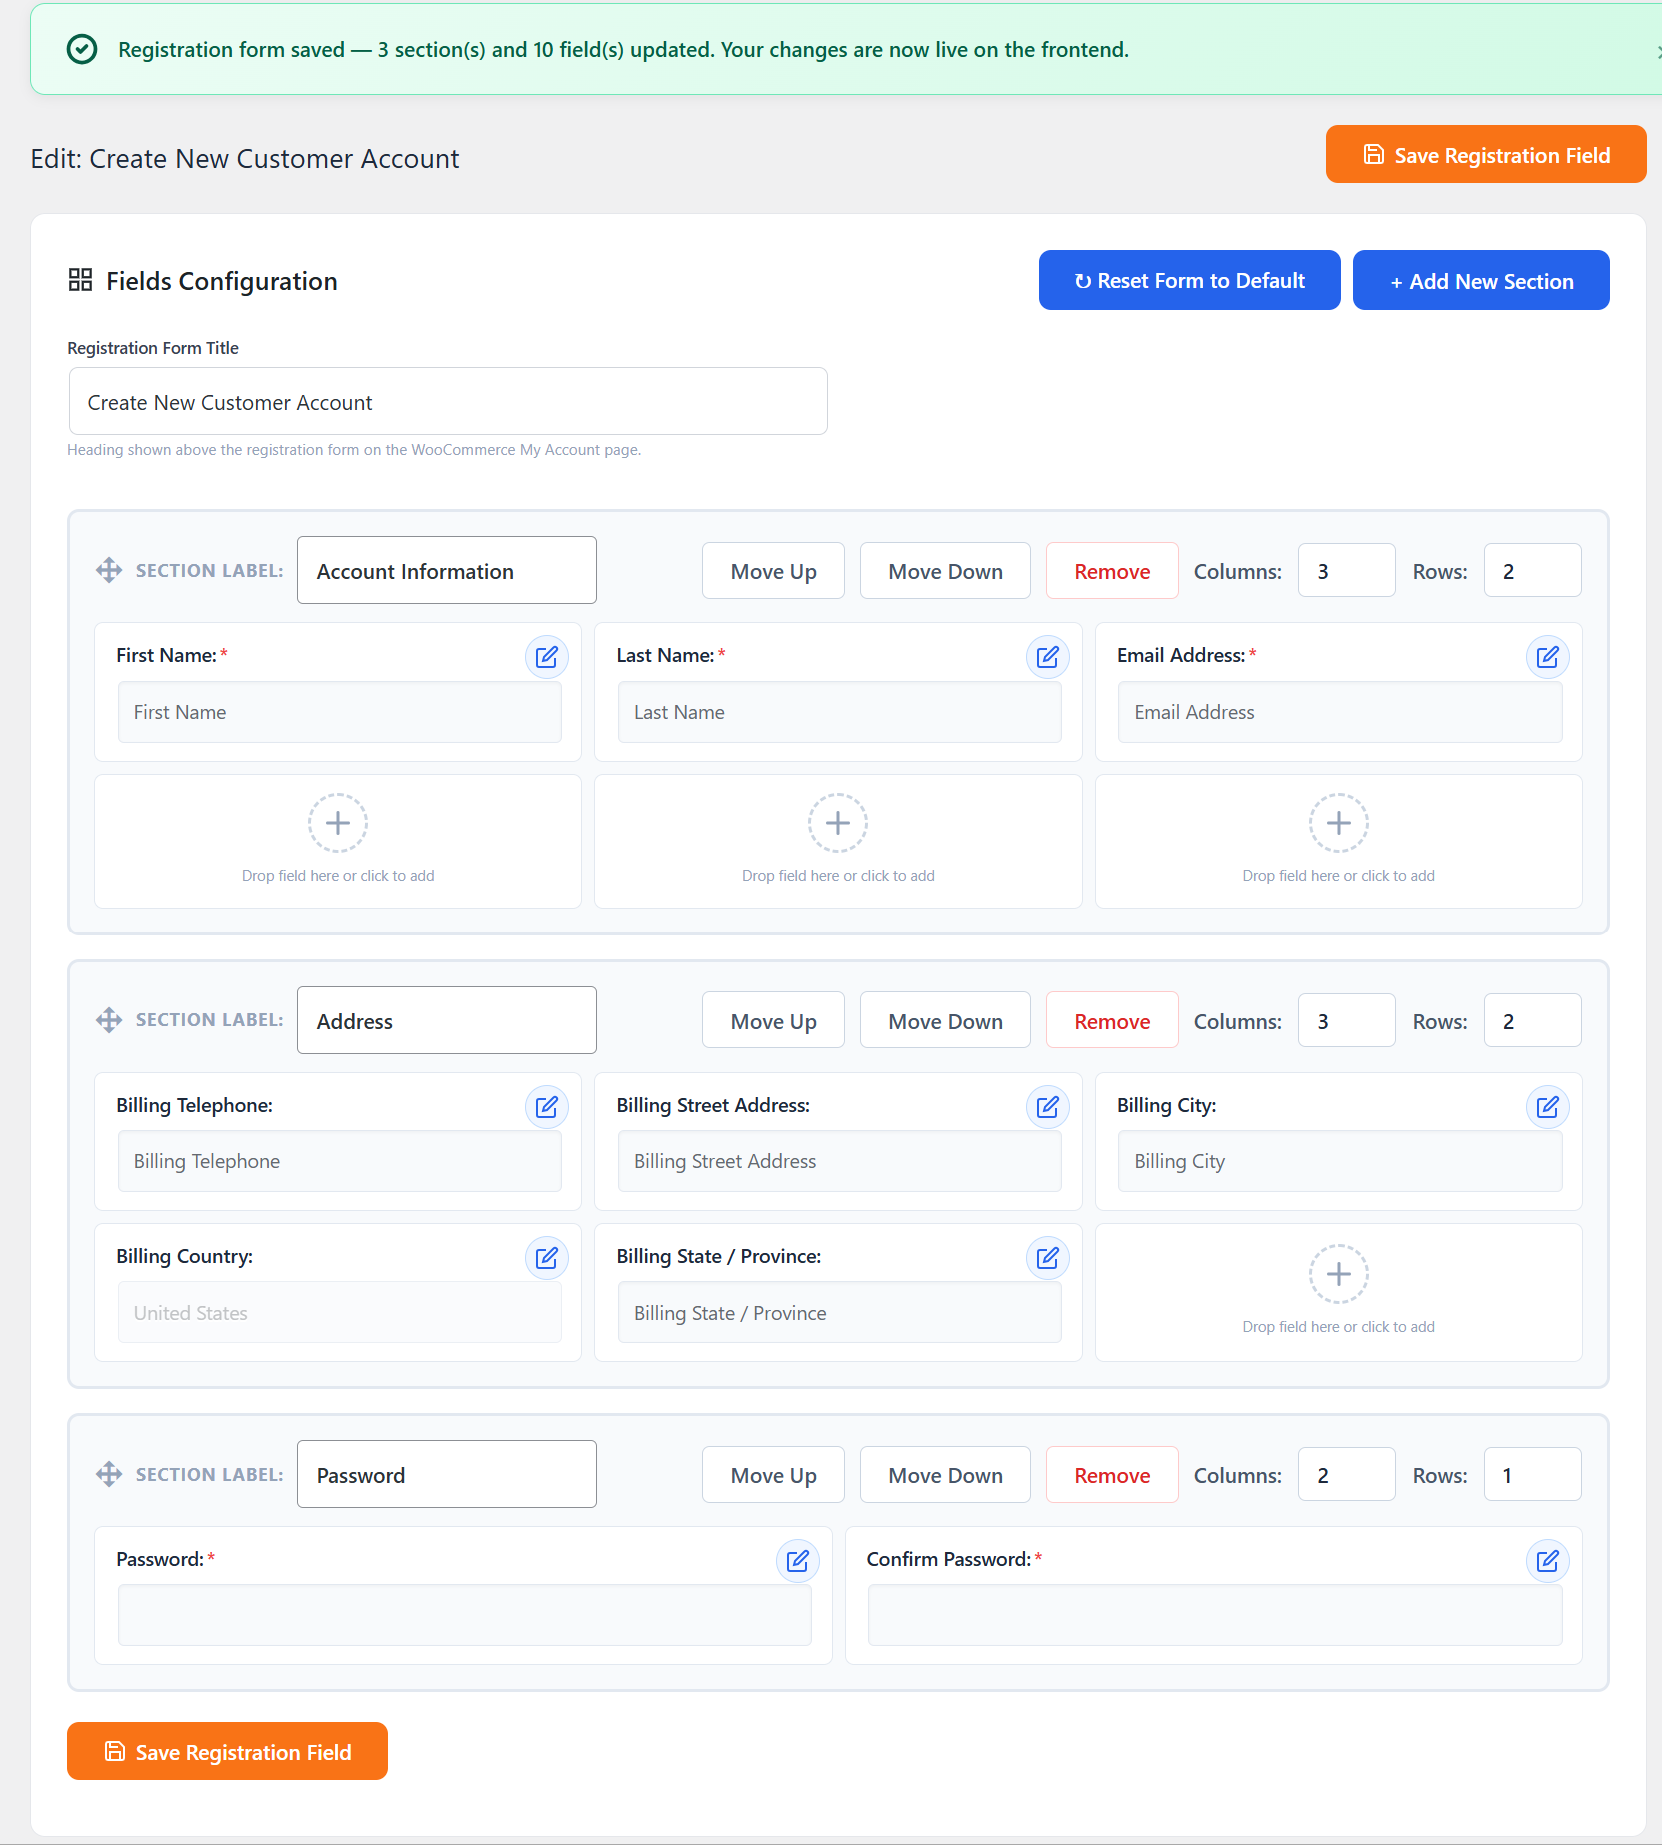
wp-admin: Form Configuration > Save Confirmation
What this shows: Displays a confirmation message that the registration form was saved, showing sections such as ‘Account Information’, ‘Address’, and ‘Password’. The ‘Save Registration Field’ button is visible.
This screen confirms that the changes made to the registration form have been saved and are live on the frontend. It shows the entire form structure, including newly added sections and edited fields, ensuring users have full control over the form’s layout.
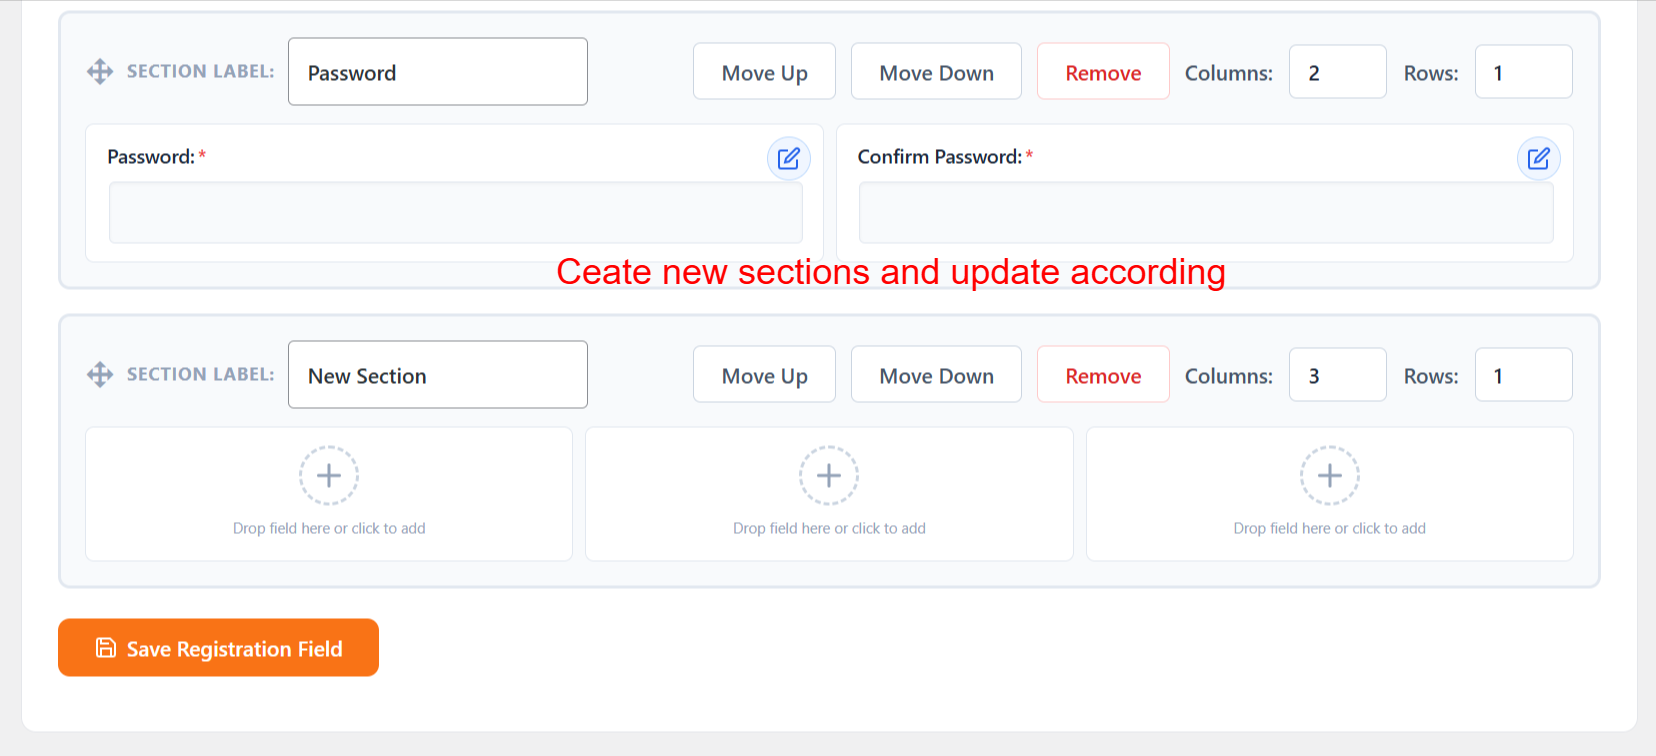
wp-admin: Form Configuration > Create New Section
What this shows: Shows the ‘Password’ and ‘New Section’ areas with options to add fields or remove sections. The ‘Save Registration Field’ button is also visible.
Here, users can add new sections to the registration form, allowing further customization. The interface supports moving sections, adding new fields, and deleting unwanted sections, creating a flexible registration form tailored to varying user requirements.
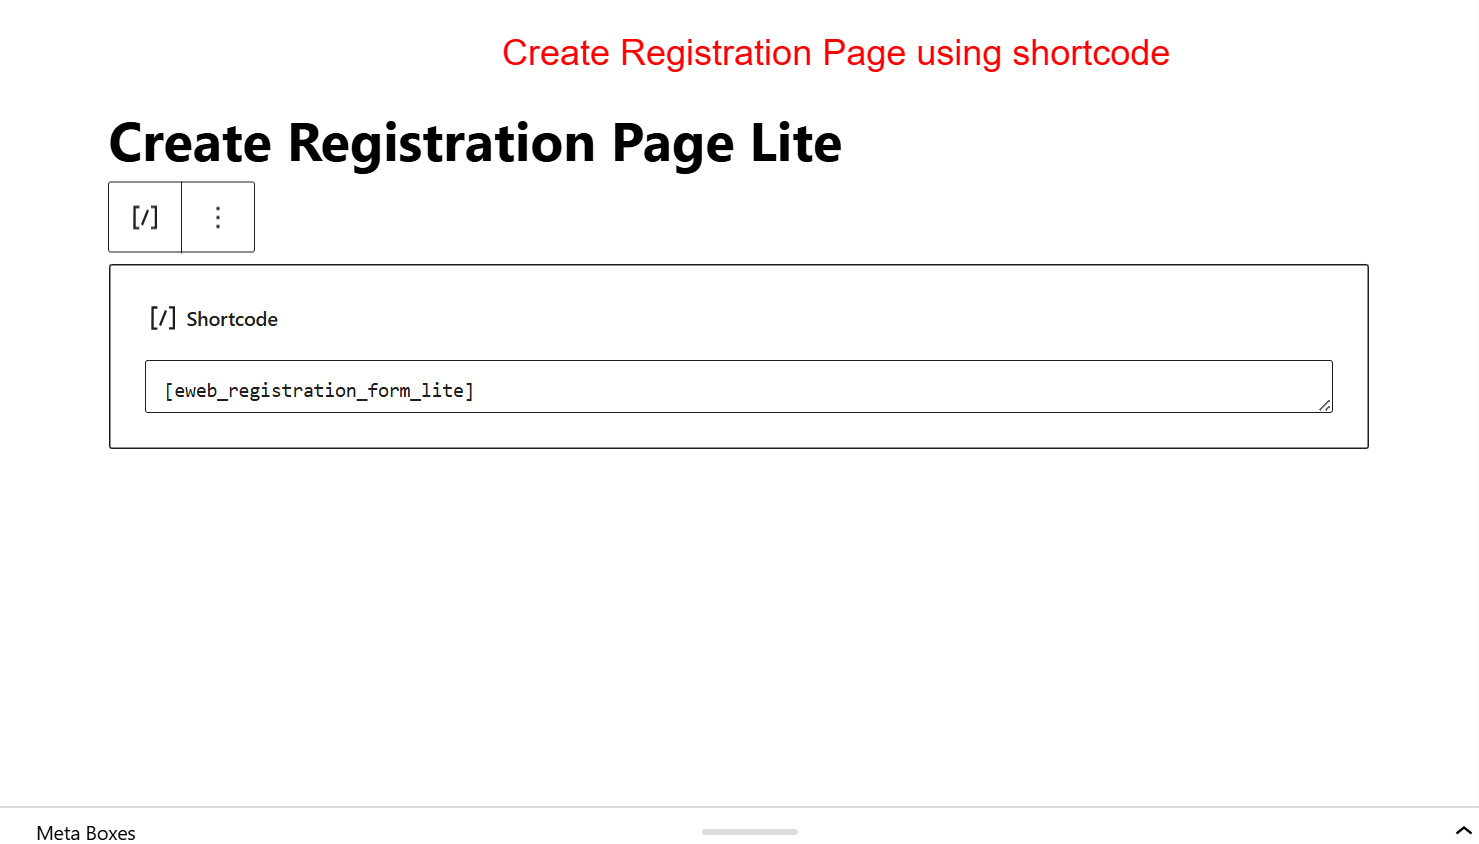
wp-admin: Create Registration Page Using Shortcode
What this shows: Contains a shortcode editor where ‘[eweb_registration_form_lite]’ is displayed to create the registration page.
This screen guides users in creating a registration page using a shortcode. By embedding the provided shortcode into a page, users can effortlessly display the custom-built registration form on their site, making it accessible to visitors.
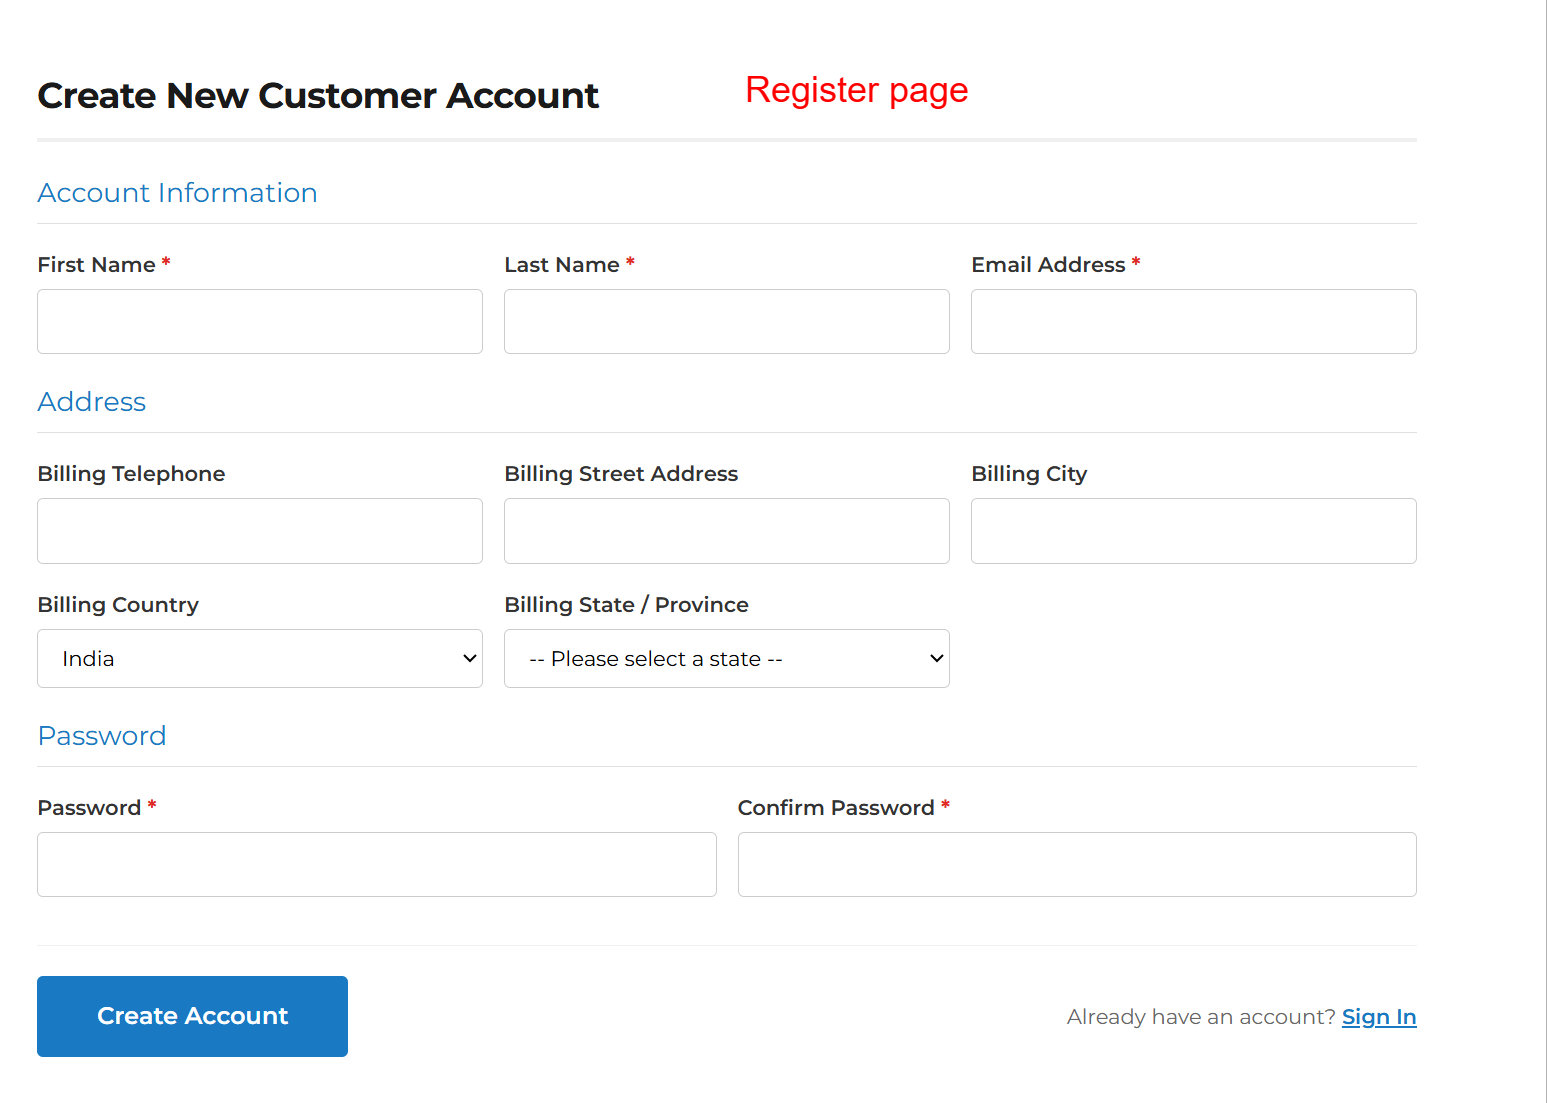
Frontend: Customer Registration Page
What this shows: The registration page includes sections for ‘Account Information’, ‘Address’, and ‘Password’ with fields like ‘First Name’, ‘Billing Telephone’, and ‘Password’.
This is how the registration page appears to visitors. It captures essential information through the customized fields set up in the admin area. Providing a user-friendly registration process, it encourages account creation and enhances user engagement.
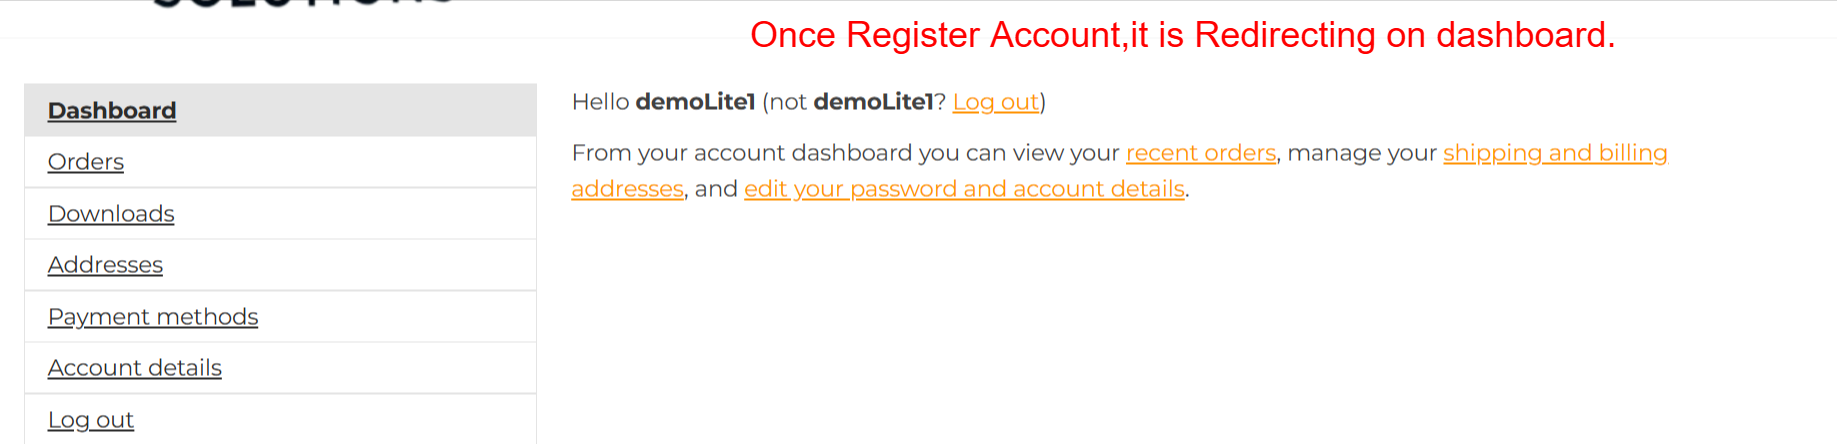
Frontend: User Dashboard Overview
What this shows: The dashboard includes navigation options for ‘Orders’, ‘Downloads’, ‘Addresses’, etc. It welcomes the user and provides account management links.
Upon successful registration, users are redirected to the dashboard where they can manage various account details such as viewing orders, managing addresses, and editing account settings. This centralized hub empowers users to have greater control over their shopping experience.
Frontend: User Dashboard – Billing Address
What this shows: Displays the billing address details with an ‘Edit Billing address’ link available.
This section of the user dashboard shows the current billing address with an option to edit it. Providing users with easy access to update their billing information helps ensure transactions are smooth and addresses remain accurate.

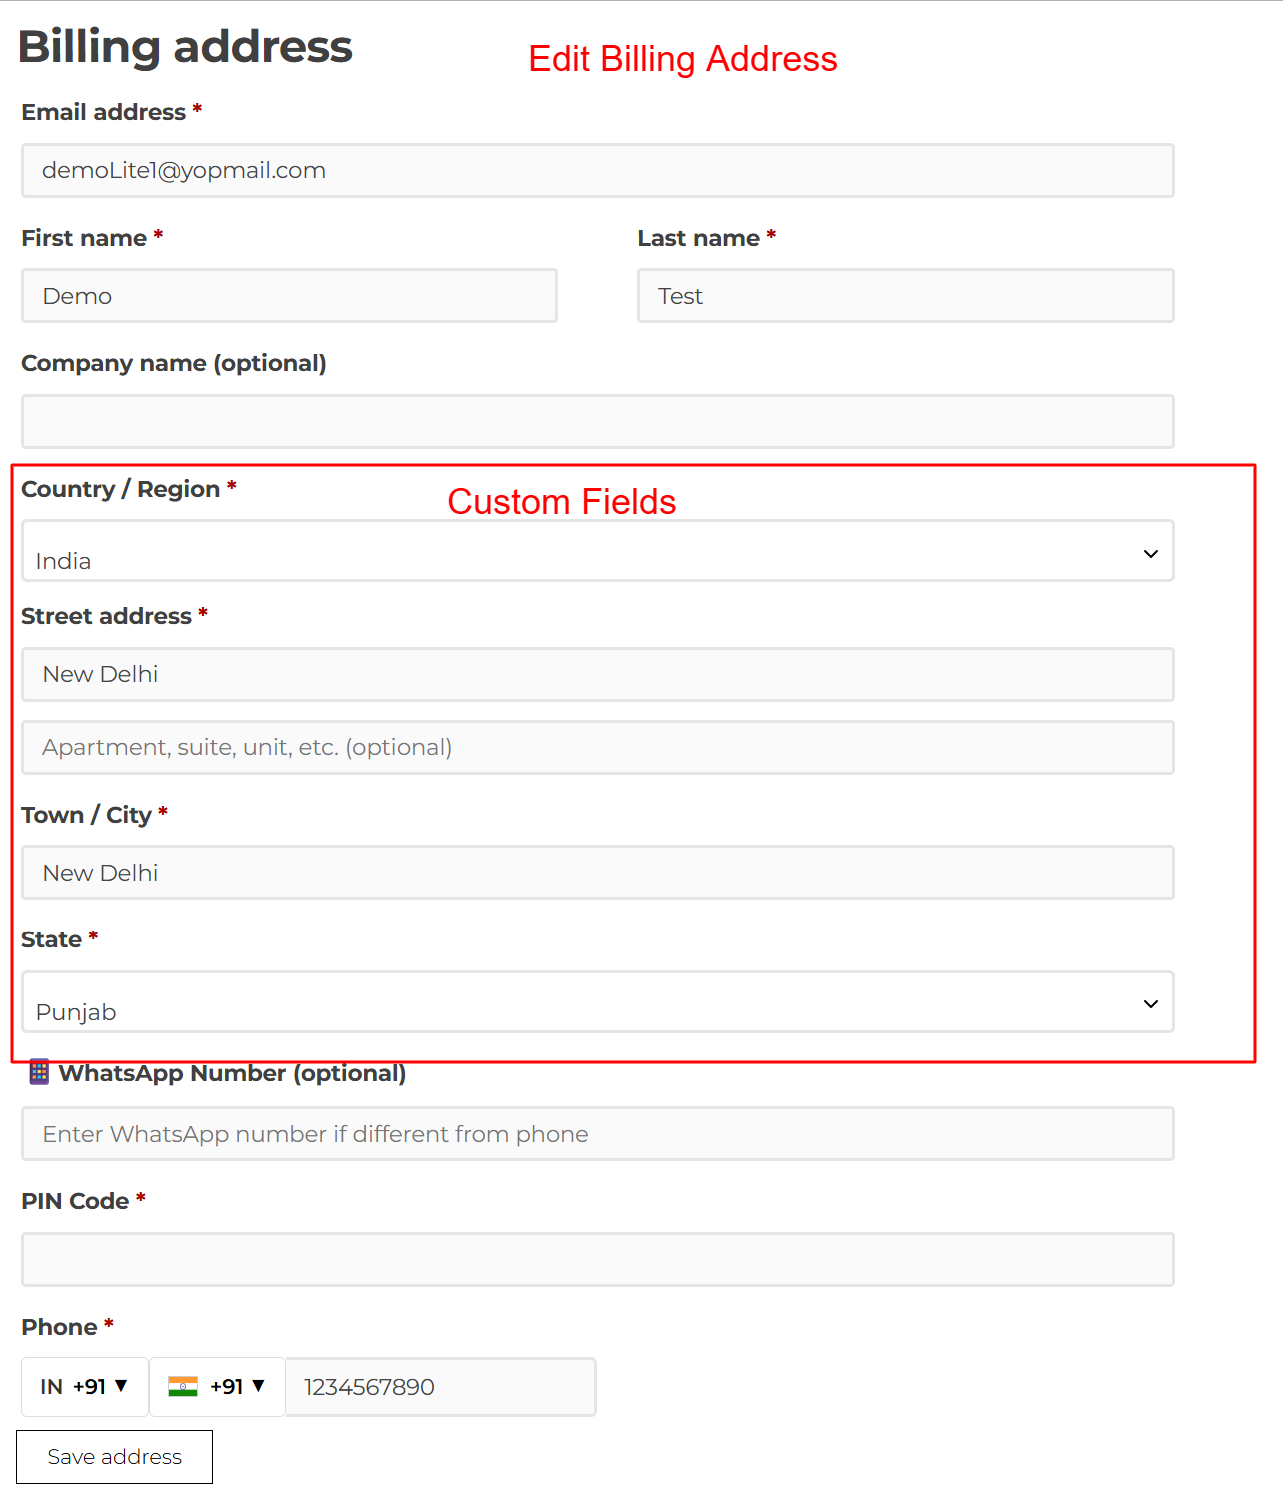
Frontend: Edit Billing Address
What this shows: Contains fields to edit billing details such as ‘Email address’, ‘First name’, ‘Country/Region’, etc.
On this screen, users can update their billing address by filling in the relevant fields. This interface makes it straightforward to alter personal information, ensuring the user can quickly adapt their details to suit any changes in status or location.
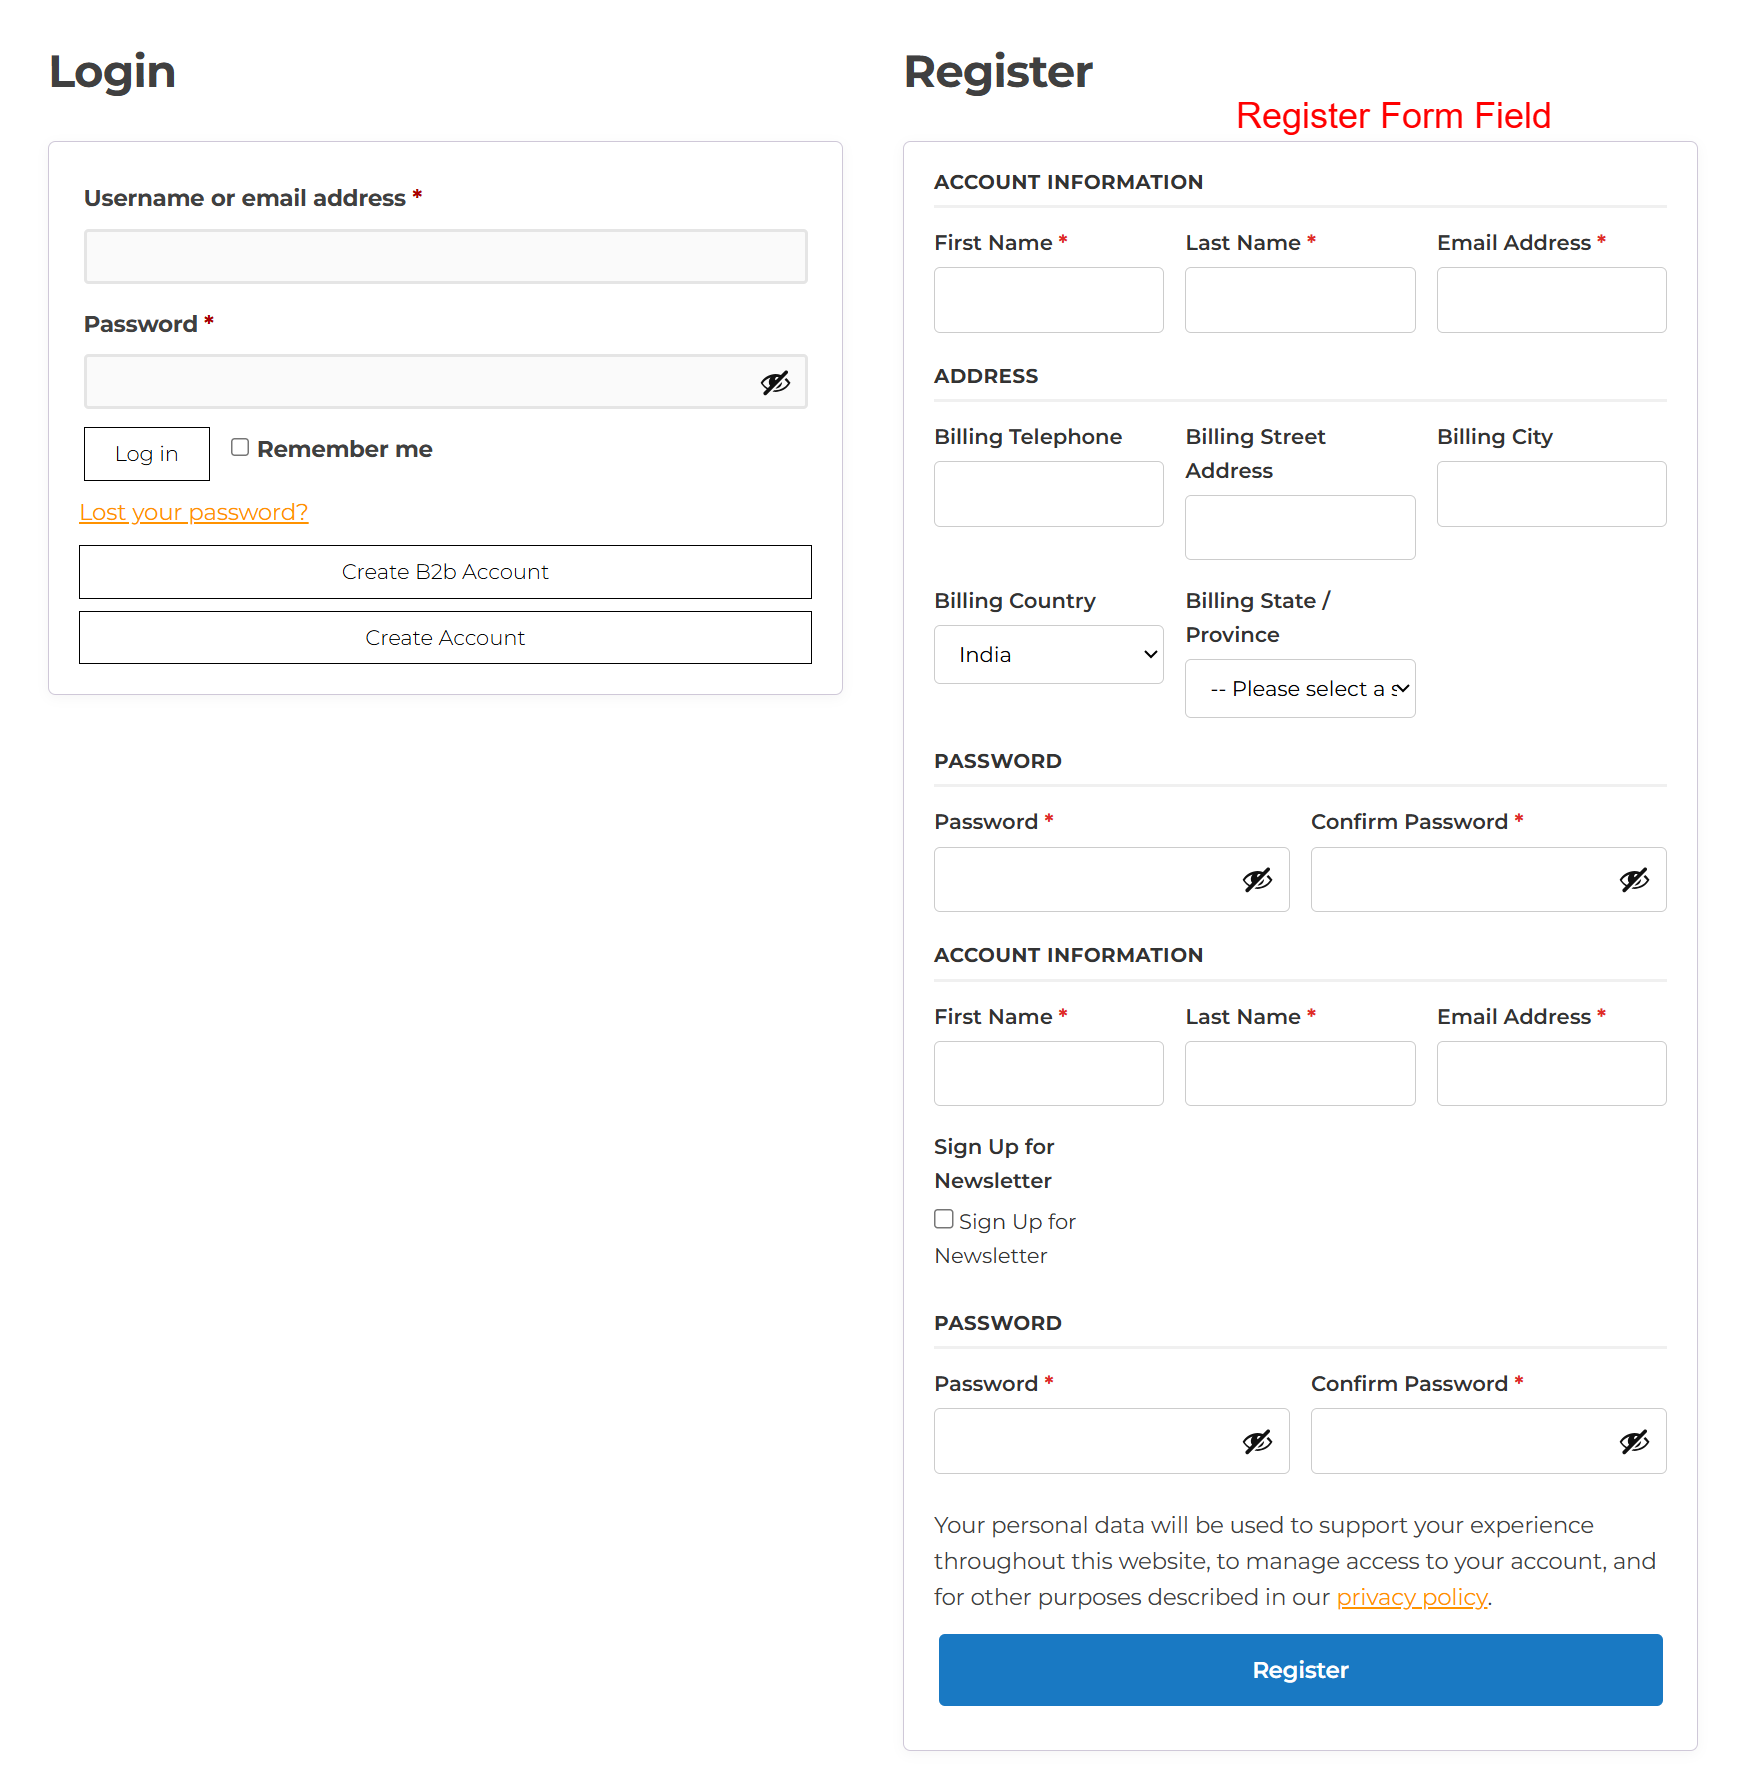
Registration and Login Page Interface
What this shows: The interface displays login fields for ‘Username or email address’ and ‘Password’, as well as registration fields like ‘First Name’, ‘Last Name’, and ‘Email Address’. Options for ‘Billing Information’ and newsletter signup are also visible.
This page is pivotal for new users who want to register for an account and existing users logging in. The registration form extends default WooCommerce fields by enabling fields for personal and billing information. Users can create an account or log in with ease, making this screen essential for user onboarding.
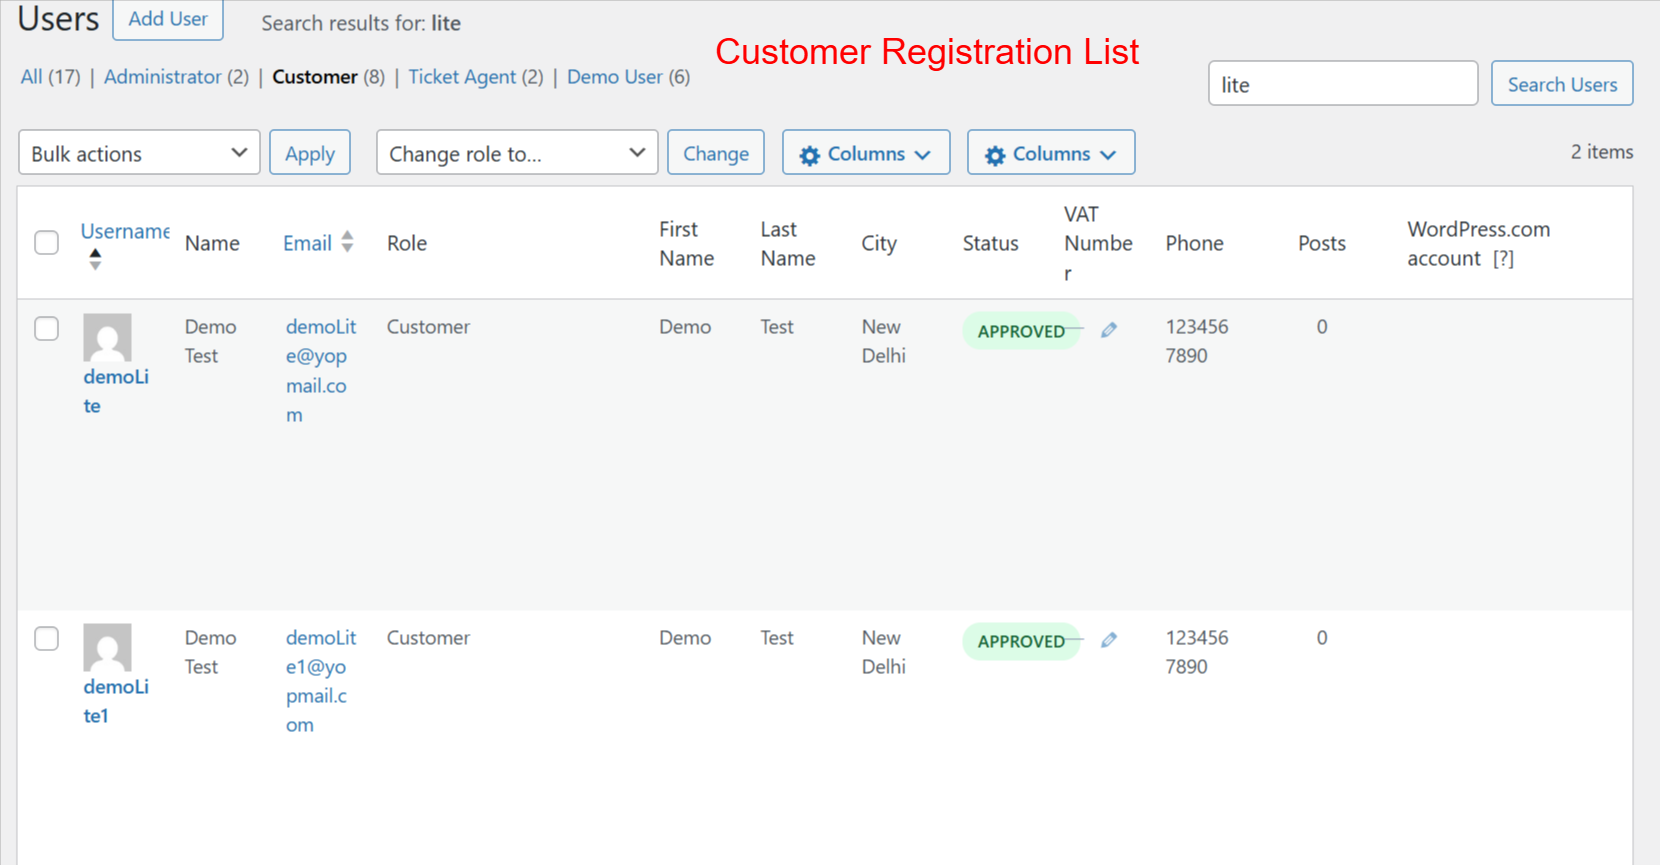
Admin Dashboard: User List Overview
What this shows: This screen lists users with columns for ‘Username’, ‘Name’, ‘Email’, ‘Role’, ‘City’, ‘Status’, and other details. Options for bulk actions and filtering by role are available.
Admins use this screen to manage user accounts effectively. It provides insights into user roles, status, and personal details, enabling quick edits and status updates. This functionality is crucial for maintaining a clean and organized user database, especially in a WooCommerce environment.
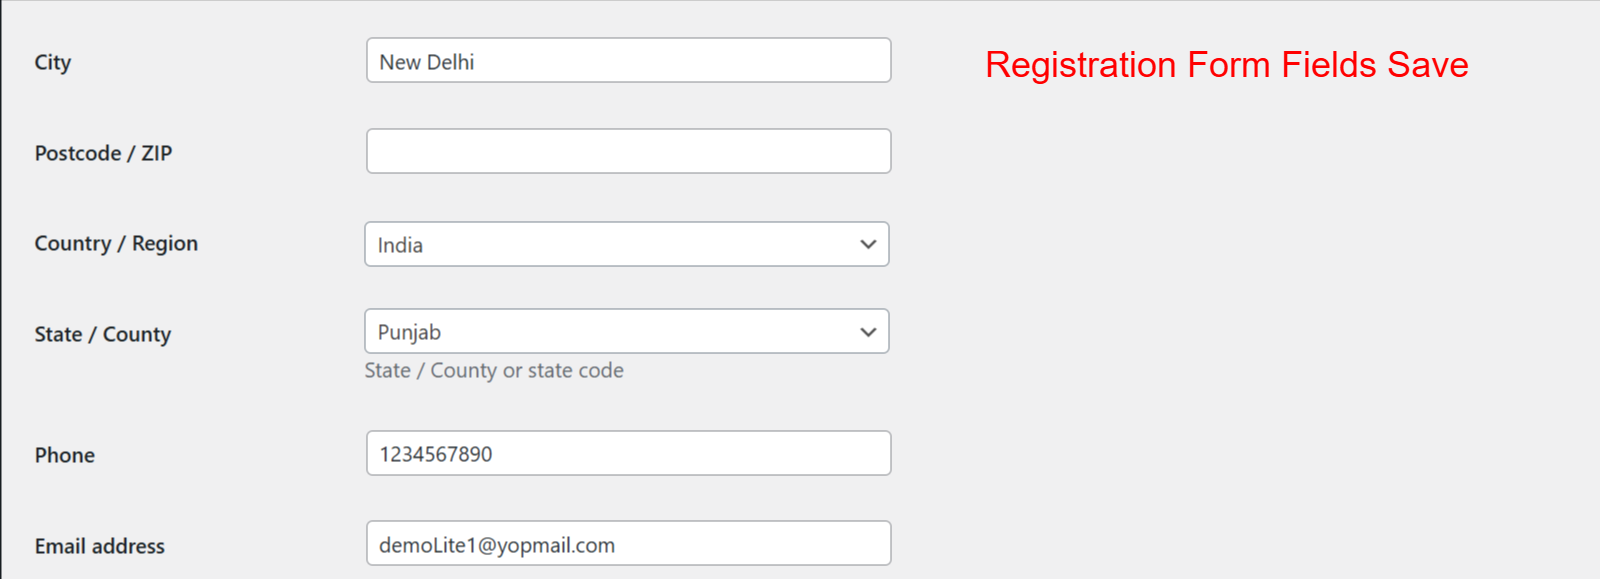
User Fields: Registration Data Saved
What this shows: Fields such as ‘City’, ‘Postcode’, ‘Country’, ‘State’, ‘Phone’, and ‘Email Address’ are displayed, indicating saved registration data.
Once registered, user details are saved and viewable here. This screen allows admins to review saved user data, facilitating better understanding and management of registrations. It’s integral for verifying user information and ensuring accuracy within the WooCommerce system.
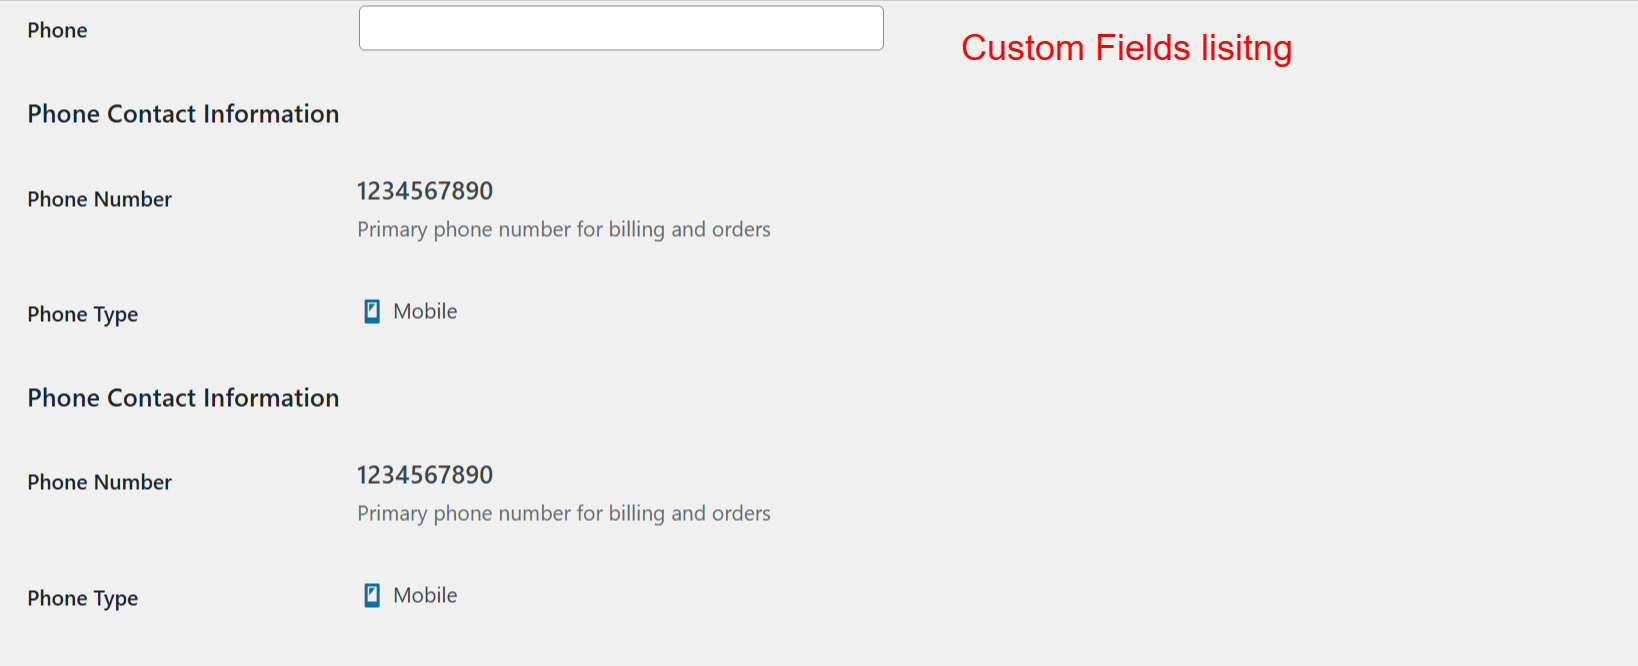
User Custom Fields Listing
What this shows: It lists custom fields like ‘Phone Number’ and ‘Phone Type’, providing additional contact information.
Custom fields shown here enrich user profiles with detailed contact information. Admins utilize this screen to view or edit custom fields that users have filled out during registration, enhancing personalized communication and service. This is vital for businesses leveraging custom data in WooCommerce.